Dear Mid-Century Homeowners,
Painting all your woodwork was NOT a good idea.
That is all.
Love,
The 21st century homeowner

Friday, March 25, 2011
Thursday, March 24, 2011
Well, that job's jobbed

Before on the left. After on the right. (yeah, I should've taken the picture with the outlet tester proudly showing no red, two yellow lights!)
Puzzle for the day: how in the heck did they break the receptacle like that?
Practical question: what to do about the deep-mounted box? Shim out the outlet so it's flush with the faceplate?
Puzzle for the day: how in the heck did they break the receptacle like that?
Practical question: what to do about the deep-mounted box? Shim out the outlet so it's flush with the faceplate?
Update: The setback really isn't deep enough to use a box extender (they're designed so you can put a new layer of drywall over an old wall and not remount the boxes 1/2"-5/8"). Evidently there are purpose-made spacers for this task, but there are craftier solutions: You can wrap a length of #14 copper wire around a small screwdriver to make a coil tube, or you can cut a drywall anchor to an appropriate length to use as a spacer. Our local hardware guy just recommended loosening the receptacle-to-box screws and tightening the faceplate-to-receptacle screw to pull the receptacle forward, but I'm leery of relying on the plastic faceplate as the main structural support for the receptacle. (Imagine 200 cycles of plugging and unplugging the vacuum cleaner; no way that such a solution would last.)
Because stripping paint all day wasn't good enough...
We decided to haul a bunch of doors back to the dorm and set them up to strip, since it's spring break and we've got our whole hallway to ourselves! To protect the hall, we first laid down two layers of plastic, and then a thorough coating of old RedEyes. Thanks, RedEye!
We had dinner, packed the wee ones off to bed, turned up the volume on Part I of the season finale of Top Chef so we could hear it in the outside hall, and started off. Here's where we are after the first coat of stripper has been applied and scraped:


Yes, we are insane and decided to do three at a time, since that's what will fit in our hallway. Hey, we have twelve to do, and this is the only week we can spread out like this, so we're taking advantage of it! If we can get these three done, we'll consider it a good week at the dorm. Then, we have to figure out how we can continue with project door restore when we no longer can occupy entire hallways.....
If you are wondering what doors these are, - the two that are less-stripped (more paint) are 1) Varro's room to the hallway and 2) Varro's room to Nelly's room. The last picture shows one of the library doors, which is 7 feet tall and super heavy, and also apparently much less painted, because that one is stripping beautifully!
Also, for those of you who are looking for the right tools, these became my new best friends last night: the two edge paint scraper (use cautiously, but it works like magic), and the plastic butter knife. Yep, the last works like a charm on loose paint in the curvy bits of trim, and doubles to remove all the junk that accumulates on your magical two-edge paint scraper! This project moved light-years faster when we started to arrive at the right tools. A week and a half ago, we started Varro's room using two 1.5 inch plastic putty knives. After wearing out 4 of those in one weekend and making little progress, we decided a new strategy was needed. Tim did yesterday's house project with two metal putty knives, and he brought those home to work on the doors. I tried out the two-edge, and it conveys a clear advantage over even the metal putty knives, as long as you don't get over-enthusiastic and start scraping off door! (I did put a slight scrape in one of the doors, so word to the wise.....)
The last thing we need to find is an easier way to attack the curvy bits, so we're looking into that. Stay posted.
Oh, and Nelly and I have been reading the BFG. Having analyzed the story thus far, she reported last night that she knows two important things:
1) Dreams come from your heart.
2) You should blow good dreams from your heart at your friends.
Wednesday, March 23, 2011

Midday Update
Okay, maybe this won't be entirely live-action, but at least it's a multi-update day...
I've got two comparison shots that will show the progress Tim's made.
This is after several rounds of Citri-strip and scraping:
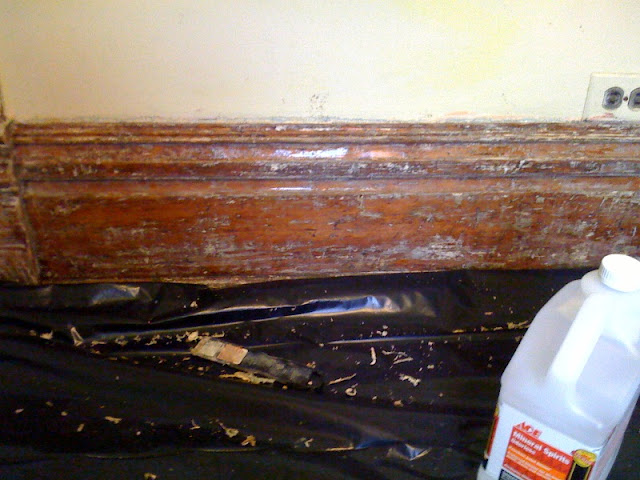
And this is after mineral-spirits treatment:

Here's a zoom out of the area, with the vertical shown in the picture above on the left:

Pretty awesome! Tim reports that he's getting the hang of things, so that's really encouraging.
BTW, we've divided this task into parts according to relative height: Tim will be doing the verticals (door frames, windows) and I'm going to do the baseboards. So that's likely why the beautiful wood you see in the last picture is one of the verticals. Let's hope he can teach me how to do it as well with the baseboards.
Also, this closeup shows that this is likely to be heart pine. Check out this history on heart pine in the United States if you are interested. Yes, I know it's a company that sells wood for interiors, but the write-up was pretty cool: http://www.heartpine.com/about/history_heartpine.shtml It would be awesome if that was the case, and if the floors matched, even better. Because the floors were painted and are currently in such bad shape, it's hard to tell right now if the coordinate with the baseboards and wall trim.
Live Action Renovation Part I
Today, Tim's taking the day off work to really tackle all that woodwork in Varro's room. He's armed with plastic sheeting, new scraping tools, steel wool, 3 jugs of Citri-strip, mineral spirits, two thermoses of coffee, and a load of determination. We hope that we can get a lot of the wood trim stripped and restored ourselves, so we can dedicate our contractor money to things we really aren't in a position to do, like restore the floors and windows.
I asked him to keep me updated, and we thought it might be entertaining to do live updates on the blog, since this is a rare time when one of us will have full access to the internet and the other will be working in the house.
Step I: He's got the plastic sheeting down:

In good news, we had a contractor out yesterday to look at the house and give us some quotes on some of the things we need to have done. This was a really useful benchmark. While it would be great to be able to just plunk down $16,500 and have the floors, baseboards, doors, and windows in all of the upstairs rooms and the library all done by professionals, we just don't have that moolah!
Now, a bit of a digression is necessary here to explain what we're thinking currently for these rooms:
A common practice in the Victorian period was to use the lavish and expensive materials, such as hardwood for flooring and baseboards and elaborate plastering decorations in the public areas of a home, like the parlors, dining rooms, entrances, and main staircases, and then economize on the private spaces. This means that homes like ours have beautiful, narrow hardwood floors in the main spaces (since floorboards were likely pit-sawn, narrower flooring would mean more work went into producing the boards, so they were more expensive.) And, indeed, our house has stunning hardwood flooring and equally lush 11 inch baseboards and trim throughout the first floor, up the staircase, and along the upstairs hallway, all of which would be visible to a visitor. If you've been following along, you also know that, to our great relief, we've found good flooring in the library, which was once the kitchen. We haven't investigated that thoroughly yet, so it's possible this isn't the same flooring as the rest of the downstairs, but we do know it's not pine and it does look like it's in pretty good shape. We're keeping the carpet on it for now, because there's a lot of tromping up and down the basement stairs with big boxes going on, and these are accessed through the library.
But, back to the upstairs floors. Wide-planked pine flooring and pine baseboards were the materials used to construct these more humble rooms in the Victorian period, and that is indeed what we've found underneath the ancient (not in a good way) carpet and layers of paint. While we could go ahead and rip it all out and install hardwood and new baseboards, the irony is that in today's house-decorating world, those wide-planked boards are all the rage! Our floors are 3/4 inch pine, overlaid on a 3/4 inch subfloor (we also happily discovered this subfloor, since we'd originally thought that the floors were laid directly on the joists).
So, we were very relieved to hear that the contractor who saw the house yesterday believes that the pine floors in the four bedrooms upstairs can be sanded and restored. He estimates that sanding and putting a hard finish on the floors in the four rooms (about 600 square feet) will be about $2400. That's great, as far as we are concerned! Of course, we will keep investigating further, but it was really great news that the floors could be restored, instead of having to replace them.
And, as you know, our initial forays into the stripping world (come on, you knew we'd have to go there sometime...) have revealed that awesome bright-finished pine baseboard under the gunky white paint. I envision warm, pine floors and baseboards with some awesome updated colors gracing the kids rooms, all lit by beautifully restored wood-framed windows. That is also an area where I think we'll need some help. I think some of these windows haven't been opened in at least 16 years, so they will need some serious work to get them moving and in good shape again. Our first estimate was $600 a window (x 8 windows) for depainting, reglazing, and restoration of the hardware. Seems reasonable. We'll keep looking, but it's a good starting point.
And don't worry, when we get to the point where we can contemplate paint colors, we'll put all those up for your consideration and take comments and votes! We need to pretty much paint every room in the house, so for those of you who love making those decisions, we're happy to hear from you, as we are paralyzed by the dizzying array of options that exist.
Monday, March 21, 2011
Support and Distract
An equally important function in home renovation for young families is the young families part. So, on Sunday we traded work times. I spent the morning on round three of scrape, scrape scrape in V's room and engaged in an initial round against the spider webs (actually, curtains would be more accurate) in some of the basement windwos, while Tim wrangled children into the bathtub at home. Then, we traded and I hauled the newly laundered children to the Nature Museum, a favorite location for our butterfly girl. We spent some time in the butterfly haven:
 A few of the more tame species were amenable to photos:


AND, wouldn't you know, Varro decided to blatantly ignore the rules (I suppose having no idea what I was saying when I read the rules to him might have something to do with this decision), and in an amazing Karate Kid moment, before I could even get the camera focused on what I thought would be a charming shot of the little guy WATCHING a canoodling pair of butterflies, he had one of them by the wing and it was rapidly being shoved in his mouth! Here's the initial capture of the hapless victim:

So, dropped my camera and managed to pry the poor butterfly from his strong little fist, but even when he was free, for some reason he refused to vacate the premises, and fluttered around Varro for some time, to Varro's great amusement.


And the children were fascinated with the waterfall, so I managed to get one moderately reasonable two-child photo:

Here's our beautiful butterfly girl, complete with wings!

AND, wouldn't you know, Varro decided to blatantly ignore the rules (I suppose having no idea what I was saying when I read the rules to him might have something to do with this decision), and in an amazing Karate Kid moment, before I could even get the camera focused on what I thought would be a charming shot of the little guy WATCHING a canoodling pair of butterflies, he had one of them by the wing and it was rapidly being shoved in his mouth! Here's the initial capture of the hapless victim:

So, dropped my camera and managed to pry the poor butterfly from his strong little fist, but even when he was free, for some reason he refused to vacate the premises, and fluttered around Varro for some time, to Varro's great amusement.
"What an excellent game, mommy! Look, the butterfly wants me to catch it again!"

Now both butterflies are flying around me - twice as fun! Maybe I can eat both!

"Lemme at 'em! I know I can catch him again!"

"Bye Bye Butterfly!"

Subscribe to:
Posts (Atom)