
Friday, July 1, 2011
Wednesday, June 22, 2011
The beat goes on....updates on V's room
Apologies for the long delay in posting - we've been so busy wrapping up the academic year, traveling, packing, and renovating, it's been tough to fit in blog posting!
But, things are progressing. More to come soon, but for now, here's a few updates on the work we've done so far upstairs.
Say hello to the 650 sq feet of beautiful four-inch-wide American Cherry (natural) that we have acquired for the upstairs bedrooms, helpfully sorted and stacked by Moi and our good friend, PJLR:
![]()
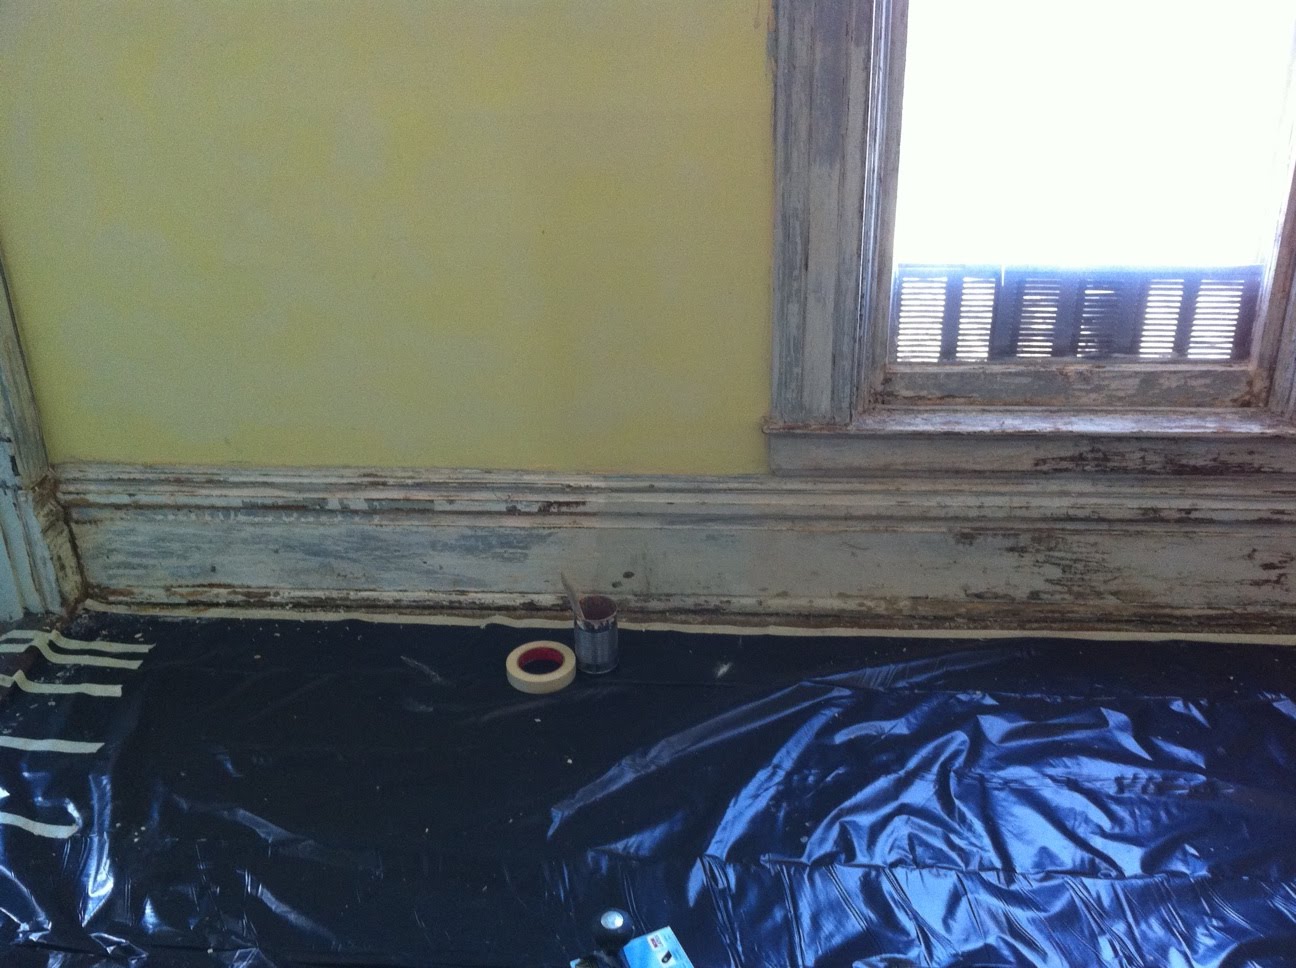
And, I'm super happy to say that we've FINISHED stripping and sanding the trim in V's room. A few minor touches on the windows to go, and we'll be set. So, we took out the foot on the trim and vacuumed the room and trim thoroughly to prepare for staining. Here's what we're looking at now:
![]()
![]()
Doesn't look like much, right? But we are optimistic that with our combination of stain, new floors, and, oh, you know, some fresh paint, this will be a super cute little boy room.
We also tested the stain out, and are excited with the preliminary results. Caution - these photos were taken immediately after the stain, and after two weeks, it's mellowed quite a bit. But I think you can see the possibilities in these pictures....
![]()
![]()
But, things are progressing. More to come soon, but for now, here's a few updates on the work we've done so far upstairs.
Say hello to the 650 sq feet of beautiful four-inch-wide American Cherry (natural) that we have acquired for the upstairs bedrooms, helpfully sorted and stacked by Moi and our good friend, PJLR:

And, I'm super happy to say that we've FINISHED stripping and sanding the trim in V's room. A few minor touches on the windows to go, and we'll be set. So, we took out the foot on the trim and vacuumed the room and trim thoroughly to prepare for staining. Here's what we're looking at now:


Doesn't look like much, right? But we are optimistic that with our combination of stain, new floors, and, oh, you know, some fresh paint, this will be a super cute little boy room.
We also tested the stain out, and are excited with the preliminary results. Caution - these photos were taken immediately after the stain, and after two weeks, it's mellowed quite a bit. But I think you can see the possibilities in these pictures....


Wednesday, June 8, 2011

Sunday, May 29, 2011
Emergency gutter trepannation
Today I'd planned (inter alia) to take some pictures of the various work that needs doing on the southeast corner of the house. There's water damage, and we were aware of this—we're just making a plan for what needs doing and how.

the various work that needs doing on the southeast corner of the house. There's water damage, and we were aware of this—we're just making a plan for what needs doing and how. In particular, I was aiming to find out where the water was coming in, what damage the water had done, how to stop the water coming in, and what needed to be done to repair the done damage.
The window is just as much of a mess as we'd thought. The top of the window frame is shot; there were two pieces of wood making up the exterior casing: one sitting horizontally and projecting 2 inches, providing what's nowadays done with an aluminum drip edge. Below that was the flat (relative to the wall) trim, maybe 5 inches wide. Half the drip edge is gone; half of that casing piece is split away, too, and—as you can see in the photo—the split angles back toward the house, funneling rainwater into the window and wall. Oy. Stay tuned for updates on all this, I'm just getting to today's adventure.
As I was up on the ladder, it started to rain. Hey, a great opportunity to see where the water's
going, check out the guttering. I went inside and upstairs to look out the window, to take a picture from above. Here's what I saw:
Holy moley. The picture doesn't show it terribly well, but there's a huge spray of water directly against the house. With great vigor. Clogged drain. Clogged drain + water + cold=ice, expanding and splitting the gutter; split gutter plus [still-]clogged drain plus 1" per hour of rain times, oh, 450 sq feet for the half of the roof this is draining, works out to about 18 cubic inches of water per second. Oof. It's not the leak at the top of the window, but it's certainly not doing anything good for the wall. And it's doing certain not good quickly.
Time to get back on the ladder, with the shears and the dead blow hammer, and relieve the pressure in a direction other than directly against the wall.


Snip, snip, bash, bam. Oh, with that 1"per hour rainstorm on my head.
Seamless gutters, anyone? And a big ol' clearing-out of the drainage.
Friday, May 27, 2011
List of compatible metals
Fight galvanic corrosion! Don't use dissimilar metals in an electrolytic solution! What's an electrolytic solution? Well, in the long enough term, water or even damp air (particularly if you're dealing with pipes that remain cool and encourage condensation). What's a dissimilar metal? The good people at Jamestown Distributors have provided a list. If the metals are close by in the list, they're okay together, if not, don't use (or insulate. Or there's the option of provided a sacrificial chunk of metal but I don't know the technicalities.). For the homeowner? This is important when you're dealing with water pipes, window frames, gutters, flashing and exhausts, anytime you've got metal outside the house.
| Mercury Monel Nickel Bronze (silicon) Copper Brass (red) Bronze (phosphor) Tin Lead Steel (stainless) Iron Steel (mild) Aluminum Cadmium Galvanized (iron and steel) Zinc Magnesium |
Thursday, May 19, 2011
Tuesday, May 10, 2011
Monday, May 9, 2011
Garden progress
A few of you might remember a post a few months ago about the garden, and how we have no idea what's actually in it! So here's a few updates on what we've seen so far:
In March, we discovered we had a ton of snowdrops and some lavendar striped crocuses:

In April, we found that the backyard and the front yard are carpeted with little blue squills:
 (front yard - see our red-right-returning porch post?)

 No house is complete in spring without a cheery daffodil or two.....
 And in May, these little tulipy-type flowers suddenly appeared in the back yard along the fence line....along with the beginnings of a carpet of Lily of the Valley - my favorite! can't wait for those to bloom, which should be any day now.

 Also, a lush growth of curly ferns have popped up throughout the back yard, which really looks amazing with the pond:
 And, of course, the Chicago perennial....we've got a variety of hostas. While some years ago I was fairly anti-hosta, I have come to admit that they are darn easy to grow, and they pretty much look good and come back year after year, no matter what you do to them. Which has a certain appeal from a homeowners' point of view!!
In March, we discovered we had a ton of snowdrops and some lavendar striped crocuses:

In April, we found that the backyard and the front yard are carpeted with little blue squills:


Thursday, May 5, 2011

Wednesday, May 4, 2011
We're still alive
In case you wondered if the acquisition of power tools was followed by death and dismemberment, I have good news: the past couple of weeks brought no end of non-renovatory work (and hence bloglessness). As well as planning, meaning the accordian growth and shrinkage of the to-do list. No, come to think of it, it's been only slime-mold-like growth on the to-do list.

We did check off one item completely: "Select flooring for bedrooms." The answer is 4" wide American Cherry, "Natural" Grade.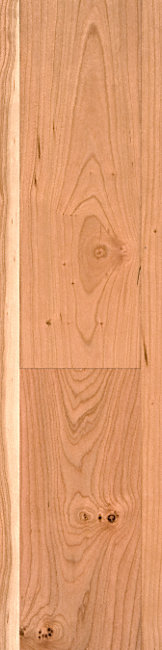
It will, we think, complement the hallway and downstairs well, without trying to be matchy-matchy (which would be more or less impossible given the first-growth oak that lies there). The finish looks a little darker in real life than in that photo, and we went with the "Natural" rather than "Select" grade because the imperfections bring it more depth and personality. (One of us, incidentally, likes the variations-to-light, the other the variations-to-dark; we'll let you puzzle that one over!)
Meantime, in addition to acquiring the use of a pile of tools, the paint removal in the smallest bedroom is almost done and we've started sanding the trim in preparation for staining and varnishing. Word on the interwebs is that we want an alkyd varnish for trim (it's not as hard as polyurethane, which is what you'd aim for with floors, and a lot easier to work with).
And we're planning (we think) on jacking up the sag in the middle-front of the house. 3" of settlement there. We're booking a structural engineer to take a look and see whether what we think is possible (lifting the main timber of the first floor, putting a pad atop the existing pillar, and building some new well-framed walls in the basement) will keep things on the level for the next 130 years. More on that project anon.
Friday, April 22, 2011
We have awesome friends.

Something new? Well, there will be a new fridge soon.
Something borrowed? Check, check, check, check... This is the house
the village (re)built.
Thursday, April 7, 2011
Still kickin' (and scrapin'), and a Word from Our Sponsor
A promissory note. We've been busy scraping paint and moving stuff, and we'll have pictures of some lovely naked wood (I hope that phrase doesn't impact our Google Safe Search rating. Gosh, along with all the "stripping" references... what is this coming to?), ready for varnishing, by the weekend. We've also been meeting with various contractors, and, best of all, arranging to borrow some very necessary and very expensive tools (a HUUUGE thanks to Steve!). Which brings me to the topic of today's post:
A word from our sponsor
This stuff is expensive. Tools, materials, accessories, replacements, beer for the volunteers (if you made vague noises about joining in the work, know that there will be reward and drop us an email!)... it all adds up. To which end we are selling out.
We've signed up for the Amazon-Affiliates deal wherein we get a kickback for directing traffic to Amazon. So if we mention something with a link to Amazon, you click through there, and then purchase anything at all from Amazon within 24 hours, we get a few cents on the dollar. And cents on the dollar add up; our last two Amazon purchases were both under $10: Tyvek painting overalls and safety glasses.
Given that our traffic consists mostly of those who love or at least pity us, we've also created an Amazon wishlist for the house. If any perusers of the wishlist have comments in the vein of "Oh, you have the Dickens & Bronte brand smokeshifter on your list; the Tolstoy-Kropotkin model is much better," we'll welcome them. Now...
Back to our unusual programming
Just for kicks, I googled "un-muddied" to see where we stack up (not very well). This wasn't the top hit, but it was the best: An Un-Muddied Bloody Mary, using the seeds-and-juice that one usually throws away when making tomato sauce. It looks delish; and I can't wait to sip a few on the back porch. When the tomatoes grow. And when the work is done...
Coming down the pike
A post on The Worst-Hung Door in the World (and coming even further down the pike: "What We Did About It").
A word from our sponsor
This stuff is expensive. Tools, materials, accessories, replacements, beer for the volunteers (if you made vague noises about joining in the work, know that there will be reward and drop us an email!)... it all adds up. To which end we are selling out.

My blog has been valued at...
$50.93
Blog Valuation Tool from BlogCalculator.com
We've signed up for the Amazon-Affiliates deal wherein we get a kickback for directing traffic to Amazon. So if we mention something with a link to Amazon, you click through there, and then purchase anything at all from Amazon within 24 hours, we get a few cents on the dollar. And cents on the dollar add up; our last two Amazon purchases were both under $10: Tyvek painting overalls and safety glasses.
Given that our traffic consists mostly of those who love or at least pity us, we've also created an Amazon wishlist for the house. If any perusers of the wishlist have comments in the vein of "Oh, you have the Dickens & Bronte brand smokeshifter on your list; the Tolstoy-Kropotkin model is much better," we'll welcome them. Now...
Back to our unusual programming
Just for kicks, I googled "un-muddied" to see where we stack up (not very well). This wasn't the top hit, but it was the best: An Un-Muddied Bloody Mary, using the seeds-and-juice that one usually throws away when making tomato sauce. It looks delish; and I can't wait to sip a few on the back porch. When the tomatoes grow. And when the work is done...
Coming down the pike
A post on The Worst-Hung Door in the World (and coming even further down the pike: "What We Did About It").
Monday, April 4, 2011
Listing photos
We've gotten a lot of, "okay, now we know what the floors and the baseboards look like, but a wider perspective of the house would be kinda nice, too!" So, for your viewing pleasure, I've included the listing photos, so you can see how the place looked when we fell in love with it. I'll post more pictures of the rooms as we go along with our moving and renovation, but I thought these photos might be a nice start because they show the house when it actually had things in it! My apologies, though - these aren't the highest quality....
Our little brown house:

Front entryway and staircase:

Front parlor (we've debated calling this a living room, but the furniture in this picture clearly says, "parlor!"

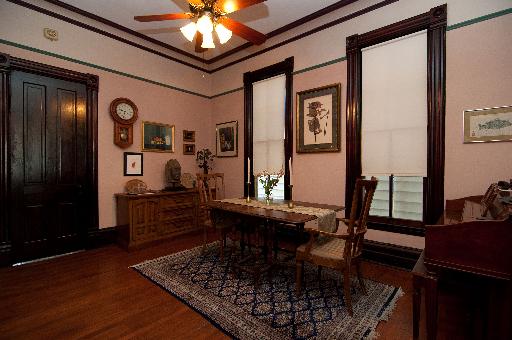
Dining Room:

Office. This room was originally the kitchen, which is why the door to the basement is in this room. (Behind you, in this picture.) Also, the white post hidden in the corner on the far right is actually the old fireplace/chimney for the kitchen, which has been sealed off. This room became an extra bedroom when the original owner got older and didn't want to be traveling up and down stairs (in the 60s), and a new kitchen (stay tuned for a classic 1960s kitchen in a frame or two) was built, complete with plastic tile, birch cabinets, and an additional resplendently pink half bathroom. We are going to make this room our library.

I told you it was classic 1960s. Like the sink? Yes, it is seafoam green. Enamel over cast iron, we believe. All that empty space above the tiny cabinets are empty soffit. Seriously? Cabinets, here we come!

Master bedroom, main room. Through the doorway is the second room of the master suite. The painting on the wall to the right is of Mount Calvary, complete with crucifix. A little heavy, first thing in the morning, don't you think? To the left, you can just see the wing of a skeletal pteradactyl, at least that's what we think it is. Yep.

Attic room! I'm super excited about this room. It was a bedroom for the previous owners, but we're going to make it a craft room for the family. Yay! Also, will double as a guest bedroom, don't worry! Note: much as it causes us great glee every time Nelly talks about the "snowsuit staircase" (i.e., the hallway that is as hectically painted as her snowsuit is patterned), that spongepainting will not be there for much longer, we hope.....

Deck and view of the back yard in the spring/summer. Hard to see in this photo, but on the left rail of the deck is a waxing and waning moon series, including stars, a galaxy, and a UFO. Nelly loves the UFO. And on the front and right sides of the deck is a beautiful carved rising sun. This is really hard to see in this picture, since the tree is right in front of the sun itself, but you can see a few of the carved rays in the rails on either side of the tree.

View of the back of the house, fish pond, and deck. We haven't seen the yard in bloom like this yet, so we are excited to see what comes up. But, as you know if you've been following along, we've had some hints here and there of things to come....

You might be thinking, aren't there other rooms, like the kids's rooms, and maybe a bathroom or two? Yes, there are two other bedrooms (yellow = the one Varro will be in, where we've almost finished stripping paint, and blue = the one Nelly will be in), and a bath and a half. There are reasons these weren't included in the listing - the two bedrooms were both being used as offices, so they were completely full of stuff, and I'm sure it was hard to take a good listing picture at the time. And the bathrooms....well, the half bath is about 3 ft wide by 10 ft long, is pretty much floor-ceiling in beige plastic tile, and includes a pink sink, a pink toilet, and a 1960s medicine cabinet with cracked plastic sidelights. The upstairs bath is more promising and has some great tile, which we will showcase later, but, I'm sure the agent wasn't excited to put out there right away that there's no proper shower, by modern standards! But, there is a lovely clawfoot tub....with red-painted toenails. Sigh.
Our little brown house:

Front entryway and staircase:

Front parlor (we've debated calling this a living room, but the furniture in this picture clearly says, "parlor!"

Dining Room:
Office. This room was originally the kitchen, which is why the door to the basement is in this room. (Behind you, in this picture.) Also, the white post hidden in the corner on the far right is actually the old fireplace/chimney for the kitchen, which has been sealed off. This room became an extra bedroom when the original owner got older and didn't want to be traveling up and down stairs (in the 60s), and a new kitchen (stay tuned for a classic 1960s kitchen in a frame or two) was built, complete with plastic tile, birch cabinets, and an additional resplendently pink half bathroom. We are going to make this room our library.

I told you it was classic 1960s. Like the sink? Yes, it is seafoam green. Enamel over cast iron, we believe. All that empty space above the tiny cabinets are empty soffit. Seriously? Cabinets, here we come!

Master bedroom, main room. Through the doorway is the second room of the master suite. The painting on the wall to the right is of Mount Calvary, complete with crucifix. A little heavy, first thing in the morning, don't you think? To the left, you can just see the wing of a skeletal pteradactyl, at least that's what we think it is. Yep.

Attic room! I'm super excited about this room. It was a bedroom for the previous owners, but we're going to make it a craft room for the family. Yay! Also, will double as a guest bedroom, don't worry! Note: much as it causes us great glee every time Nelly talks about the "snowsuit staircase" (i.e., the hallway that is as hectically painted as her snowsuit is patterned), that spongepainting will not be there for much longer, we hope.....

Deck and view of the back yard in the spring/summer. Hard to see in this photo, but on the left rail of the deck is a waxing and waning moon series, including stars, a galaxy, and a UFO. Nelly loves the UFO. And on the front and right sides of the deck is a beautiful carved rising sun. This is really hard to see in this picture, since the tree is right in front of the sun itself, but you can see a few of the carved rays in the rails on either side of the tree.

View of the back of the house, fish pond, and deck. We haven't seen the yard in bloom like this yet, so we are excited to see what comes up. But, as you know if you've been following along, we've had some hints here and there of things to come....

You might be thinking, aren't there other rooms, like the kids's rooms, and maybe a bathroom or two? Yes, there are two other bedrooms (yellow = the one Varro will be in, where we've almost finished stripping paint, and blue = the one Nelly will be in), and a bath and a half. There are reasons these weren't included in the listing - the two bedrooms were both being used as offices, so they were completely full of stuff, and I'm sure it was hard to take a good listing picture at the time. And the bathrooms....well, the half bath is about 3 ft wide by 10 ft long, is pretty much floor-ceiling in beige plastic tile, and includes a pink sink, a pink toilet, and a 1960s medicine cabinet with cracked plastic sidelights. The upstairs bath is more promising and has some great tile, which we will showcase later, but, I'm sure the agent wasn't excited to put out there right away that there's no proper shower, by modern standards! But, there is a lovely clawfoot tub....with red-painted toenails. Sigh.
Friday, April 1, 2011
The death sconce
So, a few weeks ago, brimming with motivation to de-fuzz/dust/clean the main floor of the house, I mopped all the floors with that magical solution, Murphy's oil soap, cleaned and oiled the baseboards, cleaned the fireplace with granite cleaner, and then set out to tackle the light fixture that I could reach, that being the sconce on the wall in the parlor. It's not our style, and it's not really the style of our house, but hey - it's a light fixture and if it works, right now, it wouldn't be high on our list to replace.
It was a goldish-brassish fixture with brass-colored rosettes, chandelier crystals and candle-like lights. And, it was so dirty it actually had dirt-fur (you know what I mean). "It was..." Am I, perhaps, foreshadowing a wee bit???
So I carried over my step ladder and my roll of paper towels and my squirt bottle of glass cleaner. I tackled all the crystals and the brass wall plaque and got it looking looking pretty decent. Then, there was the matter of the candle-stick looking things, which were stained an unpleasant, "I'm really old and not in a good way" brownish-yellowish color. So, I unscrewed all the lightbulbs, cleaned them, and placed them carefully on the mantle and started pulling off the candlesticks. To my dismay, I discovered they were actually wax-coated cardboard. Not super great, and certainly not really cleanable with my current set of products. But , this was all something I was willing to consider addressing.
HOWEVER, the second problem was rather more significant - as I was cleaning the candlestick platforms, the ******* thing nearly electrocuted me! Yes, it was off (thanks, those of you who immediately leaped to that question.) I got a shock so bad I nearly fell off the ladder, and my arm tingled for two days afterwards. Not so fun. Tim turned off the circuit for the fixture and we reassembled the fixture while the circuit was off, and then contemplated the future of the now named death sconce.
I'm happy to say, this is what we decided on:

Yep, my friends, the death sconce has left the building.
Anyone looking for a wall sconce that may cause near death experiences?
Tim thinks it was a wiring issue, not necessarily the sconce itself (which somehow has not really mitigated my mistrust and dislike of the scorned sconce.)
But, he's written a helpful explanation of what happened, for those of you DIYers who may be considering the pitfalls of old electric appliances in your homes.
Says Tim:
Standard practice: switch the light off, clean it.
ZAP!
What the hell happened?
It seems that the electrical mastermind who wired up the lamp figured, "Ah, well, as long as I wire a switch into the circuit, when we open (turn off) the switch, the circuit will be broken and the light will go off!" (It's all too obvious that the phrase "light going off" can apply to a mental state, and mean either beginning to glow or ceasing....)
Well, that's great, except that the electrical power to the fixture comes from one wire (the black wire, according to code, and in fact the circuit was wired correctly; black wire was hot) and the other wire is neutral; it's necessary to complete the circuit, but when the switch is off, there's no charge in the neutral wire. This lovely little fixture was wired with the switch in the neutral rather than in the hot wire, so that when the switch was off, current didn't flow, and the light didn't light...but the whole fixture was loaded with a 110 volt charge.
With the switch in the wrong place, it would be like shifting your car into neutral when you park it rather than turning off the engine. Not exactly great for, say, changing the oil. Another helpful illustration is a zookeeper's experiemce: cleaning the lion cage when the beast is sleeping, rather than moving him to another place is not a recommended practice.
Here's a good link: How to Determine Which Wire is "Hot" in Household Wiring | eHow.com http://www.ehow.com/how_2378765_which-wire-hot-household-wiring.html#ixzz1II3jz4YY
Text is informative and funny:
"If you have not switched off the breakers like you're supposed to and you grab the copper conductor of this wire, you will probably feel an unmistakable tingling sensation quickly travel up your arm. If you do feel it, let go of the wire because this sensation is not good for you. If this happens to you often, be sure to have someone around who knows CPR and first aid when you do home repairs."
Tuesday, March 29, 2011
On not falling down stairs

to nose-dive from the attic.
P.S. - Thanks, T&M!!
Doors day 3
Well, sorry for the delay in posting - so much going on over the weekend, we didn't have time to report!
But, because Tim and I are that dedicated to our home renovation, we did spend a lovely, if late, evening on Friday night scraping paint off the three doors, with pretty awesome success:

Although there are a few areas left to touch up with the citri-strip, these babies are pretty much ready for sanding! Now, they are safely stored in our storage unit, waiting for an evening when we can finish that touch up and get them sanded and prepped for staining.
We do have an open question: We have a bunch of door and window hardware that we need to depaint. Any recommendations for a good remover for that job? Any tips and tricks for restoring 1870s metalwork? Also, thoughts on what the appropriate finish for those?
Friday, March 25, 2011
Slow going
Sometimes, though, going slow is just slow. Below, the before-and-after for a 2-hour "soak" with Citristrip, and a half-hour of scraping.
Is it any wonder that during those two hours we got had a painter come by to measure and estimate?

Open Letter
Dear Mid-Century Homeowners,
Painting all your woodwork was NOT a good idea.
That is all.
Love,
The 21st century homeowner
Painting all your woodwork was NOT a good idea.
That is all.
Love,
The 21st century homeowner
Thursday, March 24, 2011
Well, that job's jobbed

Before on the left. After on the right. (yeah, I should've taken the picture with the outlet tester proudly showing no red, two yellow lights!)
Puzzle for the day: how in the heck did they break the receptacle like that?
Practical question: what to do about the deep-mounted box? Shim out the outlet so it's flush with the faceplate?
Puzzle for the day: how in the heck did they break the receptacle like that?
Practical question: what to do about the deep-mounted box? Shim out the outlet so it's flush with the faceplate?
Update: The setback really isn't deep enough to use a box extender (they're designed so you can put a new layer of drywall over an old wall and not remount the boxes 1/2"-5/8"). Evidently there are purpose-made spacers for this task, but there are craftier solutions: You can wrap a length of #14 copper wire around a small screwdriver to make a coil tube, or you can cut a drywall anchor to an appropriate length to use as a spacer. Our local hardware guy just recommended loosening the receptacle-to-box screws and tightening the faceplate-to-receptacle screw to pull the receptacle forward, but I'm leery of relying on the plastic faceplate as the main structural support for the receptacle. (Imagine 200 cycles of plugging and unplugging the vacuum cleaner; no way that such a solution would last.)
Because stripping paint all day wasn't good enough...
We decided to haul a bunch of doors back to the dorm and set them up to strip, since it's spring break and we've got our whole hallway to ourselves! To protect the hall, we first laid down two layers of plastic, and then a thorough coating of old RedEyes. Thanks, RedEye!
We had dinner, packed the wee ones off to bed, turned up the volume on Part I of the season finale of Top Chef so we could hear it in the outside hall, and started off. Here's where we are after the first coat of stripper has been applied and scraped:


Yes, we are insane and decided to do three at a time, since that's what will fit in our hallway. Hey, we have twelve to do, and this is the only week we can spread out like this, so we're taking advantage of it! If we can get these three done, we'll consider it a good week at the dorm. Then, we have to figure out how we can continue with project door restore when we no longer can occupy entire hallways.....
If you are wondering what doors these are, - the two that are less-stripped (more paint) are 1) Varro's room to the hallway and 2) Varro's room to Nelly's room. The last picture shows one of the library doors, which is 7 feet tall and super heavy, and also apparently much less painted, because that one is stripping beautifully!
Also, for those of you who are looking for the right tools, these became my new best friends last night: the two edge paint scraper (use cautiously, but it works like magic), and the plastic butter knife. Yep, the last works like a charm on loose paint in the curvy bits of trim, and doubles to remove all the junk that accumulates on your magical two-edge paint scraper! This project moved light-years faster when we started to arrive at the right tools. A week and a half ago, we started Varro's room using two 1.5 inch plastic putty knives. After wearing out 4 of those in one weekend and making little progress, we decided a new strategy was needed. Tim did yesterday's house project with two metal putty knives, and he brought those home to work on the doors. I tried out the two-edge, and it conveys a clear advantage over even the metal putty knives, as long as you don't get over-enthusiastic and start scraping off door! (I did put a slight scrape in one of the doors, so word to the wise.....)
The last thing we need to find is an easier way to attack the curvy bits, so we're looking into that. Stay posted.
Oh, and Nelly and I have been reading the BFG. Having analyzed the story thus far, she reported last night that she knows two important things:
1) Dreams come from your heart.
2) You should blow good dreams from your heart at your friends.
Wednesday, March 23, 2011

Midday Update
Okay, maybe this won't be entirely live-action, but at least it's a multi-update day...
I've got two comparison shots that will show the progress Tim's made.
This is after several rounds of Citri-strip and scraping:
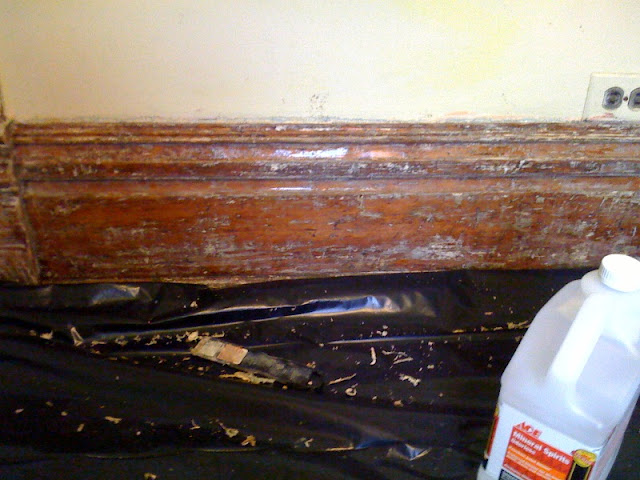
And this is after mineral-spirits treatment:

Here's a zoom out of the area, with the vertical shown in the picture above on the left:

Pretty awesome! Tim reports that he's getting the hang of things, so that's really encouraging.
BTW, we've divided this task into parts according to relative height: Tim will be doing the verticals (door frames, windows) and I'm going to do the baseboards. So that's likely why the beautiful wood you see in the last picture is one of the verticals. Let's hope he can teach me how to do it as well with the baseboards.
Also, this closeup shows that this is likely to be heart pine. Check out this history on heart pine in the United States if you are interested. Yes, I know it's a company that sells wood for interiors, but the write-up was pretty cool: http://www.heartpine.com/about/history_heartpine.shtml It would be awesome if that was the case, and if the floors matched, even better. Because the floors were painted and are currently in such bad shape, it's hard to tell right now if the coordinate with the baseboards and wall trim.
Live Action Renovation Part I
Today, Tim's taking the day off work to really tackle all that woodwork in Varro's room. He's armed with plastic sheeting, new scraping tools, steel wool, 3 jugs of Citri-strip, mineral spirits, two thermoses of coffee, and a load of determination. We hope that we can get a lot of the wood trim stripped and restored ourselves, so we can dedicate our contractor money to things we really aren't in a position to do, like restore the floors and windows.
I asked him to keep me updated, and we thought it might be entertaining to do live updates on the blog, since this is a rare time when one of us will have full access to the internet and the other will be working in the house.
Step I: He's got the plastic sheeting down:

In good news, we had a contractor out yesterday to look at the house and give us some quotes on some of the things we need to have done. This was a really useful benchmark. While it would be great to be able to just plunk down $16,500 and have the floors, baseboards, doors, and windows in all of the upstairs rooms and the library all done by professionals, we just don't have that moolah!
Now, a bit of a digression is necessary here to explain what we're thinking currently for these rooms:
A common practice in the Victorian period was to use the lavish and expensive materials, such as hardwood for flooring and baseboards and elaborate plastering decorations in the public areas of a home, like the parlors, dining rooms, entrances, and main staircases, and then economize on the private spaces. This means that homes like ours have beautiful, narrow hardwood floors in the main spaces (since floorboards were likely pit-sawn, narrower flooring would mean more work went into producing the boards, so they were more expensive.) And, indeed, our house has stunning hardwood flooring and equally lush 11 inch baseboards and trim throughout the first floor, up the staircase, and along the upstairs hallway, all of which would be visible to a visitor. If you've been following along, you also know that, to our great relief, we've found good flooring in the library, which was once the kitchen. We haven't investigated that thoroughly yet, so it's possible this isn't the same flooring as the rest of the downstairs, but we do know it's not pine and it does look like it's in pretty good shape. We're keeping the carpet on it for now, because there's a lot of tromping up and down the basement stairs with big boxes going on, and these are accessed through the library.
But, back to the upstairs floors. Wide-planked pine flooring and pine baseboards were the materials used to construct these more humble rooms in the Victorian period, and that is indeed what we've found underneath the ancient (not in a good way) carpet and layers of paint. While we could go ahead and rip it all out and install hardwood and new baseboards, the irony is that in today's house-decorating world, those wide-planked boards are all the rage! Our floors are 3/4 inch pine, overlaid on a 3/4 inch subfloor (we also happily discovered this subfloor, since we'd originally thought that the floors were laid directly on the joists).
So, we were very relieved to hear that the contractor who saw the house yesterday believes that the pine floors in the four bedrooms upstairs can be sanded and restored. He estimates that sanding and putting a hard finish on the floors in the four rooms (about 600 square feet) will be about $2400. That's great, as far as we are concerned! Of course, we will keep investigating further, but it was really great news that the floors could be restored, instead of having to replace them.
And, as you know, our initial forays into the stripping world (come on, you knew we'd have to go there sometime...) have revealed that awesome bright-finished pine baseboard under the gunky white paint. I envision warm, pine floors and baseboards with some awesome updated colors gracing the kids rooms, all lit by beautifully restored wood-framed windows. That is also an area where I think we'll need some help. I think some of these windows haven't been opened in at least 16 years, so they will need some serious work to get them moving and in good shape again. Our first estimate was $600 a window (x 8 windows) for depainting, reglazing, and restoration of the hardware. Seems reasonable. We'll keep looking, but it's a good starting point.
And don't worry, when we get to the point where we can contemplate paint colors, we'll put all those up for your consideration and take comments and votes! We need to pretty much paint every room in the house, so for those of you who love making those decisions, we're happy to hear from you, as we are paralyzed by the dizzying array of options that exist.
Monday, March 21, 2011
Support and Distract
An equally important function in home renovation for young families is the young families part. So, on Sunday we traded work times. I spent the morning on round three of scrape, scrape scrape in V's room and engaged in an initial round against the spider webs (actually, curtains would be more accurate) in some of the basement windwos, while Tim wrangled children into the bathtub at home. Then, we traded and I hauled the newly laundered children to the Nature Museum, a favorite location for our butterfly girl. We spent some time in the butterfly haven:
 A few of the more tame species were amenable to photos:


AND, wouldn't you know, Varro decided to blatantly ignore the rules (I suppose having no idea what I was saying when I read the rules to him might have something to do with this decision), and in an amazing Karate Kid moment, before I could even get the camera focused on what I thought would be a charming shot of the little guy WATCHING a canoodling pair of butterflies, he had one of them by the wing and it was rapidly being shoved in his mouth! Here's the initial capture of the hapless victim:

So, dropped my camera and managed to pry the poor butterfly from his strong little fist, but even when he was free, for some reason he refused to vacate the premises, and fluttered around Varro for some time, to Varro's great amusement.


And the children were fascinated with the waterfall, so I managed to get one moderately reasonable two-child photo:

Here's our beautiful butterfly girl, complete with wings!

AND, wouldn't you know, Varro decided to blatantly ignore the rules (I suppose having no idea what I was saying when I read the rules to him might have something to do with this decision), and in an amazing Karate Kid moment, before I could even get the camera focused on what I thought would be a charming shot of the little guy WATCHING a canoodling pair of butterflies, he had one of them by the wing and it was rapidly being shoved in his mouth! Here's the initial capture of the hapless victim:

So, dropped my camera and managed to pry the poor butterfly from his strong little fist, but even when he was free, for some reason he refused to vacate the premises, and fluttered around Varro for some time, to Varro's great amusement.
"What an excellent game, mommy! Look, the butterfly wants me to catch it again!"

Now both butterflies are flying around me - twice as fun! Maybe I can eat both!

"Lemme at 'em! I know I can catch him again!"

"Bye Bye Butterfly!"

Subscribe to:
Posts (Atom)